Professional installation is very important for the nice finish of your flooring. UniClic® & Valinge® flooring is ideal for DIY. However we still recommend an experienced installer to do the work. Our installers and contractors are fully trained for the installation.
IMPORTANT: PLEASE PROCEED WITH A VISUAL INSPECTION OF THE BOARDS BEFORE INSTALLATION. ONCE INSTALLED, THE BOARDS ARE CONSIDERED ACCEPTED BY THE INSTALLER AND THE HOME OWNER.
When the Floor is ordered, allow approximately 5%-10% for wastage and offcuts, depending upon the size or layout of the room or installation area. Timber and Bamboo Flooring is a type of natural product, which is manufactured in accordance with accepted industry standards, which permit a defect tolerance not to exceed 5%. The defects may be of a manufacturing or natural type.
There are three types of installation:
For Tongue&Groove floor board, Direct Stick is recommended for concrete slab based subfloor. Direct Stick Full Glue Installation requires highly skilled flooring installers to finish the job. This method is not easy DIY as Uniclic Floating Installation. An experienced installer is a must for this method. A floor starter or DIYer can easily fail for this job. All concrete slab with more 5% moisture level need to be professionally sealed before the direct stick. We recommend Sika Sealer and Adhesive for all timber and bamboo floor installation. Please note, glue down method needs more material and has a high labour cost.
For Tongue&Groove floor board, Secret Nail Down is recommended for plywood or yellow tongue sheet boards based subfloor. Secret Nail Method requires a floor nail gun and air compressor to do the job. Normally you need an experienced installer to gain a professional finish.
Comparing the two methods above, Bamboo Floor is the easier and budget installation method with no nails and no glue at all. But we still recommend a professional to install it. If you choose DIY, please follow the installation instruction menu.
3.1. Before bamboo flooring installation, make sure that the area to cover is dry, level, and clean, free from dirt, old adhesives, oil or grease. Do not install in a bathrooms, laundries, toilets or wet areas subjected to regular moisture or water. In a new construction, Bamboo Flooring should be one of the last items installed. All work involving water or moisture and air systems should be fully operating maintaining a comfortable room temperature. Store Bamboo Floors in a dry place being sure to provide at a least a 100mm air space under and around cartons.
3.2. Our Bamboo Flooring is designed with a 4-sided click system and can be installed on a wood sub-floor (plywood) or directly on concrete. No nails or glue during installation.
3.3. An anti-moisture barrier is required before installation to protect the flooring from any underlying moisture. For an installation over concrete, plywood, yellow tongue sheet and over a crawl space, we recommend 2mm or 3mm quality moisture barrier foam underlay.
3.4. Bamboo flooring can be installed successfully over a concrete slab, which is below grade, on grade, or above grade. The slab must be constructed properly (dry and flat with a trowel finish). New concrete is heavy with moisture, an inherent enemy of wood. Verify dryness, even if the slab has been in place over two years. Slabs should have less than 15% moisture.
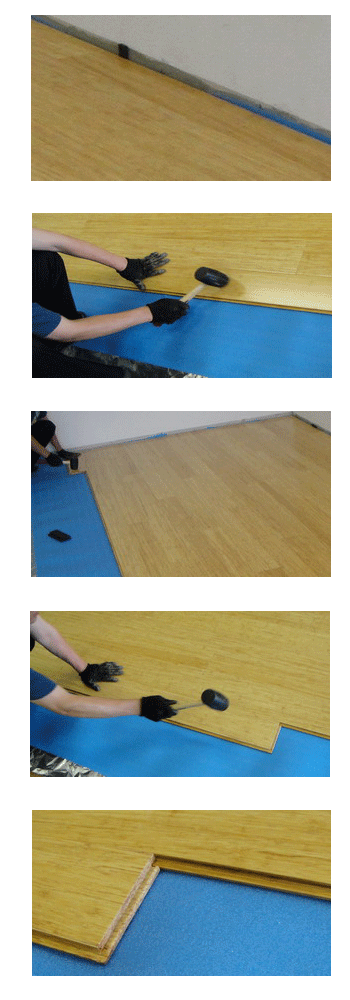
3.5. To start your first row, snap a chalk line parallel to your starting wall (usually the longest run). If the wall is not parallel, adjust the chalk-line to compensate at this time. Lay down your first row of flooring along this line. (See picture #1-2) The tongue on the first row should be cut off to allow an expansion gap. 10-12mm spacing is required on the perimeter of the room. Baseboard and quarter round can be installed to fill out the gap. Between 2 separate rooms, or in a case of a sill doorstep, a molding is required as well. In extremely dry environments, the gap should be decreased to allow for shrinkage. The opposite should be done for very wet environments.
3.6. After installing the first row, starting from the left hand side lay out the second row, tongue facing the groove of the first row, making sure that all seams are at least 150mm apart. To install the second row, lift the board at a 45° angle to row one. Be sure tongue and groove is secured tightly against one another. (See picture #3). With the Tongue side against the groove side, use a hammer with a wood tapping block and punch it lightly until the flooring closes tightly. To click the ends of the planks, use a hammer and tapping block as indicated on (See picture #4). In this order put together one row after another (See picture #5).
3.7. The long grooved part of the floor, which is the last row next to the wall, should also be cut off to keep a space at the edge of the wall, as recommended above (See picture #7). The threshold between two adjacent rooms should be kept spaced as well, or with an expansion joint.
3.8. When met with obstacles such as a post, wall or counter, keep at least 12mm spacing between the flooring and the object. Make sure to follow this instruction carefully.
3.9. Finish off your floor by installing baseboard molding and quarter round that covers the gap left along the walls. It is very important to nail the quarter round on the baseboard and not on the floor, as this will stop the normal movement of the floor.
3.10. The bamboo floor will float as it is connected together by the 4-sided click system.


